
ADDING ADVANCE OBSTACLES THROUGH CODING
In this lesson, you will learn how to make your obstacle game more challenging by adding lava blocks, changing colors and materials during play, creating kill blocks, and modifying the player’s speed and jump height. You will explore how scripting allows you to control game behavior dynamically and enhance gameplay difficulty.
Overview
Topics Introduced
- Changing obstacle colors and materials during gameplay
- Adding and scripting lava (kill) blocks
- Using functions and events for detecting player contact
- Using conditional statements for handling lava behavior
- Using loops and wait functions to control timing
- Changing player movement properties such as speed and jump height
- Debugging through console logs
Topics in Detail
1. What Is Changing Colors and Materials Through Code?
Changing colors and materials through code means altering how an obstacle looks while the game is running. Instead of manually updating properties in the Properties panel, you learn how to script automatic changes to BrickColor and Material. This helps create dynamic obstacles, such as turning a safe platform into lava for a few seconds and then back to normal.
2. What Are Lava (Kill) Blocks?
Lava blocks are obstacles that change appearance and become deadly when stepped on. You learn to script a platform so it turns “Really red” with the “Neon” material, and then use events and conditions to detect when the player touches it. When the platform is in its lava state and the player steps on it, the player’s humanoid health becomes zero. This teaches you how objects interact with the player through scripting.
3. What Are Functions and Touch Events?
Functions are reusable blocks of code that perform specific actions. You create a function called onTouch() that runs whenever a player touches the lava block. Touch events, such as Touched:Connect(), allow you to trigger these functions automatically when interactions occur. This helps you build reactive obstacles that respond to the player’s movement.
4. What Are Conditional Statements?
Conditional statements let your code make decisions. You learn how if…then…else works to decide what should happen when the obstacle is lava versus when it is safe. For example, if the obstacle’s color is “Really red,” you treat it as lava and apply the kill logic. Conditions help you build smarter, situation-based gameplay.
5. What Are Loops and Timing Functions?
Loops allow your game to repeat actions without writing code multiple times. You use a while true do loop to continuously switch a block between safe and lava states. Timing functions like wait(5) control when changes occur, creating patterns such as 5 seconds safe, 5 seconds lava. This helps you script continuous, timed behavior inside the game.
6. What Is Changing Player Speed and Jump Height?
Changing player movement properties means adjusting how fast the character walks and how high it can jump. You learn to access the humanoid inside the StarterCharacterScripts and modify WalkSpeed and JumpHeight. This allows you to adjust game difficulty by giving players advantages or challenges.
7. What Is Debugging Through Console Logs?
Debugging means checking for errors in your script using the output console. You learn that when something doesn’t work—like a loop freezing the game or a kill block not triggering—the console shows warnings or errors that guide you toward fixing the problem.
Activity 1
Title: Blocker game Part 3
Short description: In this activity, students will perform various tasks through coding like lava block, changing the walk speed and jump height of the character.
Solution: Step By Step Activity Explanation
In the previous lesson, we made a game with 7 obstacles. We also added the disappearing effect to some obstacles to increase difficulty. In this lesson, we are leveling up! Let’s go!
ADDING LAVA BLOCKS
So to spice up the game, we’ll add lava blocks. What will a lava block do?
When an obstacle will turn into lava, it will change its color and material to look like a lava block. And if the player steps on it while it’s changed to lava, the player will die.
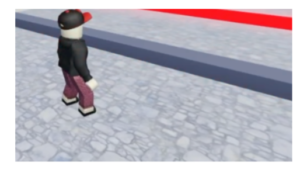
Initially, the block will look like this:
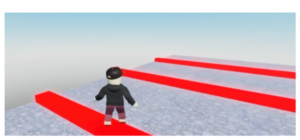
Once it turns to lava, it will look like this:
For starters, let’s add an obstacle. Insert a part and add your preferred material and color to it.
Things to keep in mind:
- Make sure to rename the part as ‘Lava 1’ in the explorer to avoid confusion later.
- Make sure the ‘Anchored’ and ‘Can Collide’ property is true.
- Make sure the part before the lava part is not disappearing. If yes, then add another part with no code on it to make the game doable.
Now, we’ll need to make the block color and material to change to look like lava while we’re playing the game. We’ll time it for 5 seconds to appear and then 5 seconds to disappear.
To make the block look like lava, we’ll change color to “Really Red” and material to “Neon”. These options are available in the property window of the block.
To time this, let’s add a new script to the ‘Lava 1’ part. You can click the + sign in front of ‘Lava 1’ in explorer and choose the option ‘Script’.
Delete the default code.
Let’s start by introducing a function:
function onTouch(part)
end
Here, in parentheses, we have added a parameter called part. This part represents the part of the player’s body that will touch the lava floor (ex. Right foot, left foot, hand) and the onTouch function will be able to use that.
We want the onTouch function to be called whenever the player is touching the obstacle. To do that, we’ll add a code outside the function loop:
script.Parent.Touched:Connect(onTouch)- The term
Touchedrefers to the event whenscript.Parentpart i.e. Lava1 part is touched by the player. - The term
Connectwill then call the functiononTouchwhich we just defined above.
Next up, we’ll create a variable called ‘humanoid’ to store the data of the Parent of the Part. For example, if the part is right foot, the variable humanoid will detect the player whose right foot touched the lava floor.
local humanoid = part.Parent:FindFirstChild("Humanoid")
The term FindFirstChild("Humanoid") finds the character whose part we’re referring to and stores that information in the variable called Humanoid.
Now, if the character is standing on the lava floor, then it dies. To code this, let’s learn about another type of loop – The IF THEN ELSE loop.
IF THEN ELSE loop is simply a condition. For example:
IF apple is ripe THEN eat
ELSE wait
The syntax for if then else loop is:
if(condition) then
   statement1(s)
else
   statement2(s)
end
Please Note: The loop also works without the ELSE condition. It’s called an IF THEN loop.
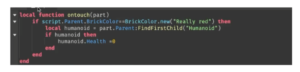
Now, if the value of the variable humanoid is not 0, i.e., the character is standing on the lava floor, then it dies, i.e., the humanoid’s health becomes 0.
if humanoid ~= nil then
    humanoid.Health = 0
end
Till now, we have added the kill condition for when the humanoid is standing on the obstacle. But we’re yet to define the condition when the obstacle becomes a lava floor.
In our case, only when the floor’s color is “really red”, we’ll call it a lava floor. Let’s code that!
if script.Parent.BrickColor == BrickColor.new("Really red") then
end
We’ll need the appearing and disappearing happening till the game is on, so we will add a while loop to do so. The syntax for the while loop is:
while(condition) do
   statement(s)
end
In our case, it will be:
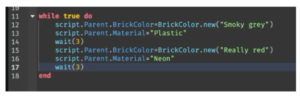
while true do
    script.Parent.BrickColor = BrickColor.new("Smokey grey")
    script.Parent.Material = "Plastic"
    wait(5)
    script.Parent.BrickColor = BrickColor.new("Really red")
    script.Parent.Material = "Neon"
end
- The term
scriptrefers to the script you’re working on. - The term
Parentrefers to the location where the script is located. - The terms
BrickColorandMaterialrefer to the property we are recalling for the part. - The term
wait(5)refers to the time, i.e., 5 seconds, for the block to turn into lava and then back to being a simple obstacle.
You can now playtest the game once to ensure the code is working.
CODING THE KILL BLOCK
Now that the color has changed, we need to make sure the player dies if he steps on the obstacle when it is lava. Let’s code the kill block!
And we’re done! Make sure to playtest the code to make sure there are no errors.
Please note: Make sure you add an end for all loops.
NEED FOR SPEED & HIGH JUMPS
The character’s speed and jumping height are set by default, but did you know, you can define that as well?
You can increase or decrease the difficulty of the game by playing around with speed and height. Let’s do that!
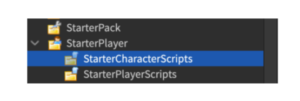
- Go to the Explorer and search for Starter Player.
- Double-click on it and choose the option StarterCharacterScripts.
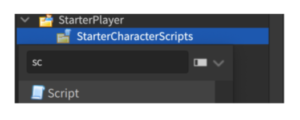
- Hover in front of StarterCharacterScripts and click on the + sign when it appears. Choose the ‘Localscript’ option from that.
- Delete the default code.
- To change the speed, write the following code:
script.Parent.Humanoid.WalkSpeed = 30
Here, the term
WalkSpeedsignifies the speed of the character. You can playtest to see if you want the speed to further increase or decrease. - To change the height, write the following code:
script.Parent.Humanoid.JumpHeight = 25
Here, the term
JumpHeightsignifies the jump height of the character. You can playtest to see if you want the jump height to further increase or decrease.
Outcome
Learning Outcomes of Adding Advanced Obstacles through Coding
- Learned to change colors and materials of obstacles dynamically through Lua scripting.
- Created lava blocks using loops, timing functions, and property changes.
- Implemented kill block behavior using functions, touch events, and conditional logic.
- Modified player movement by adjusting WalkSpeed and JumpHeight in scripts.
- Debugged scripting issues using console logs during playtesting.
Assignment: HOPPING MAGIC LAVA STONES
Today, we’ll use the game made in ACP 2 – ‘HOPPING MAGIC STONES’ and make it more difficult by making some of the obstacles lava kill blocks.
Goal
To deep-dive into coding in Roblox by increasing difficulty through lava kill blocks.
Getting Started:
- STEP 1: Open the ‘Hopping Magic Stones’ project we made in ACP 2.
- STEP 2: Go to the explorer and select the part you want to make lava kill blocks.
- STEP 3: Add a script to it. Delete the default code.
- STEP 4: We’ll first time the appearance of the block as a ‘Sea Green’ colored ‘Grass’ material brick for 5 seconds and then ‘Really Red’ colored ‘Neon’ material lava block for 5 seconds.
while true do
    script.Parent.BrickColor = BrickColor.new("Sea green")
    script.Parent.Material = "Grass"
    wait(5)
    script.Parent.BrickColor = BrickColor.new("Really red")
    script.Parent.Material = "Neon"
end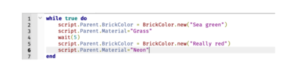
- STEP 5: Now to code the kill block i.e. when the block turns to lava, the player will die if it’s touching the block at that point. To do so, copy paste the following code:
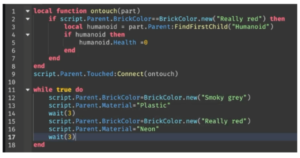
function onTouch(part)
    if script.Parent.BrickColor == BrickColor.new("Really red") then
        local humanoid = part.Parent:FindFirstChild("Humanoid")
        if humanoid ~= nil then
            humanoid.Health = 0
        end
    else
        wait(4)
    end
end

script.Parent.Touched:Connect(onTouch)
wait(4)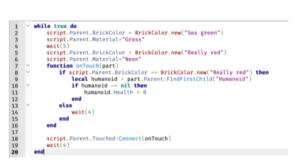
Please note: Make sure you add an end for all loops.
- STEP 6: Copy paste the following code to the blocks you want to be changed to lava kill blocks. Make sure the color and material of the block is the same in the part property and in the code.
- STEP 7: Playtest the game to make sure the code is working.
- STEP 8: Save the project.