
NEW OBSTACLES INCOMING
In this lesson, we will set up a game scene with spinning balls, disappearing stairs and obstacles on which when the player steps, the dimensions of the player change.
Overview
Topics Covered:
- Making disappearing steps – To disappear once the character steps on it
- Making movable obstacles
Getting Started
OBSTACLE 1: Disappearing Steps
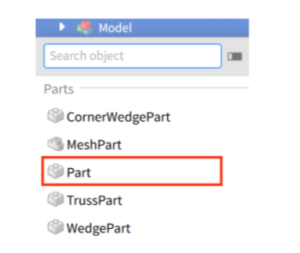
Let’s start by adding a Model to the explorer panel like done before. Now go to the model layer in the explorer panel, click + and add a part.
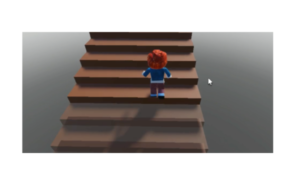
Shape the part to look like a step. Now duplicate it to form a set of stairs.

Make sure all parts are added under the same model.
Now we’ll script each part to disappear right after 0.1 second after the character touches the part. The part can then appear 10 seconds later. Let’s go.
Start by adding a script to the first part. Delete the default code from it.
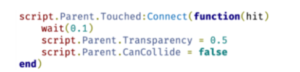
We’ll first call the Touch function as our code should only get triggered once the character touches the part. Copy paste the code for that:
script.Parent.Touched:Connect(function(hit)
end)

Once the player touches the part, the player will get 0.1 seconds to move or else the part will disappear i.e. transparency will go down to 1. Let’s code that now. Copy paste the following code:
wait(0.1)
script.Parent.Transparency = 0.5
script.Parent.CanCollide = false
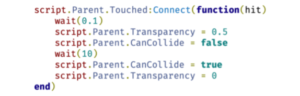
Now, we want the part to reappear after 10 seconds i.e. transparency goes to 1 and CanCollide becomes true. Copy paste the following code for that:
wait(10)
script.Parent.CanCollide = true
script.Parent.Transparency = 0
And we’re done with the code. Playtest it to confirm if the code works. And then duplicate it for every part.
OBSTACLE 2: Moving Blocks
Here comes the extremely fun bit. The moving blocks!
To make this we’ll take help of coding!
To begin with, let’s make and position the 4 blocks.
Make sure the parts are not locked. We will need all to move.
Once done, group the 4 parts by selecting all in explorer and pressing Ctrl+G.
Now add a script to the first part and delete the default code.
To make the blocks go up and down, we’ll take the help of Tween.
Tween Service provided by Roblox is used to gather information and use that to animate accordingly. In our case, we need to find the position of our part and animate accordingly.
Let’s start by making a variable called ‘TweenService’ that calls the service. To do that, copy paste the following code:
local TweenService = game:GetService("TweenService")Next up, we’ll make a variable called ‘part’ and a variable called ‘TweenInfo’ that will store the information we need. To do that, copy paste the following code:
local part = script.Parent
local tweenInfo = TweenInfo.new(2, Enum.EasingStyle.Cubic, Enum.EasingDirection.InOut, -1, true)
Once we’ve got the tween information, we’ll define the animation we need. For this part, since we’ll make it move just up and down, we’ll change the y axis. X axis and Z axis will remain constant i.e. 0 change.
local tween = TweenService:Create(part, tweenInfo, {
    CFrame = part.CFrame * CFrame.new(0, 20, 0)
})
Here, we’ve defined the animation to change by parameters (0,20,0) so the part will move up and then get back to its position.
Lastly, we’ll add the code to play the animation which is:
tween:Play()And we’re done! Playtest the game to see if it works. For the next part, we can change the y axis. We can make it (0,-20,0) so the part will go down and back to its original position repeatedly.
local TweenService = game:GetService("TweenService")

local part = script.Parent
local tweenInfo = TweenInfo.new(2, Enum.EasingStyle.Cubic, Enum.EasingDirection.InOut, -1, true)

local tween = TweenService:Create(part, tweenInfo, {
    CFrame = part.CFrame * CFrame.new(0, -20, 0)
})
tween:Play()
We can make part 3 code the same as part 1 code i.e. (0,20,0).
And we can make part 4 code the same as part 2 code i.e. (0,-20,0).
Now playtest to see if the game is doable.
And we’re done. Before we move to making the next obstacle, we’ll make sure there’s a non-moving easy obstacle to stand on in between obstacle 3 and 4. This way, the player will be able to catch a break.
Activity 1
Title: NEW OBSTACLES INCOMING!
Short description: In this activity, students will learn how to design new obstacles disappearing stairs and movable obstacles.
Outcome
Learning Outcomes of New Obstacles Incoming!
- Made stairs disappear and reappear with touch.
- Changed player dimensions when stepping on obstacles.
- All the element names in the code will have to be replaced with what the students have named their elements.
- Make sure to reiterate how logical coding is and nothing is to be crammed.
Assignment: MAKE IT YOUR OWN
To make a themed game with a themed name – add fun elements and unique obstacles. Make sure to have at least 5 obstacles in the game.