
BASIC CODING IN ROBLOX
In this lesson, you will enhance your obstacle game by adding disappearing and reappearing platforms using Lua scripting. You will code platforms to switch visibility and collision every few seconds, making the game more challenging and introducing the basics of variables, functions, properties, loops, and timing in Roblox.
Overview
Topics Introduced
- What Lua is and how Roblox uses it
- Using variables to store objects
- Creating and calling functions
- Understanding properties like Transparency and CanCollide
- Using conditional statements
- Using loops to repeat timed actions
- Finding and fixing errors using the console
Topics in Detail
1. What is Lua?
Lua is a lightweight programming language used inside Roblox to control how objects behave. You learn that Lua is easy to embed and is based on simple, clear logic. In Roblox Studio, Lua allows you to script actions like making platforms appear, disappear, move, or react to the player. Understanding Lua gives you the ability to bring your game ideas to life through code.
2. What Are Variables?
A variable is a container that stores a value that can change. You learn that constants stay the same, while variables can update—just like how your height changes over time. In coding your platform, you create a variable named platform to store the part you want to control. This helps you reference the same object easily again and again inside your script.
3. What Are Functions?
A function is a block of code that performs a specific action. You learn to create functions like disappear() and appear() to control when the platform becomes invisible or solid. Functions help you organize your code so that actions can be reused instead of writing the same lines many times.
4. What Are Properties Like Transparency and CanCollide?
Properties describe how an object looks and behaves. Transparency controls how visible the object is, and CanCollide controls whether players can stand on it or fall through it. You learn that by adjusting these properties through Lua instead of manually in the Properties panel, you can make effects happen automatically and repeatedly in your game.
5. What Are Conditional Statements?
Conditional statements allow your code to make decisions. You learn the concept through examples, such as checking when something should appear or disappear. While the lesson focuses more on functions and loops, the idea of conditions prepares you for writing more advanced logic later.
6. What Are Loops?
Loops repeat a block of code without writing it multiple times. You learn about the while loop, which keeps running as long as a condition is true—or indefinitely when the condition is simply true. In this lesson, the loop helps make your platform appear and disappear every 3 seconds by repeating a cycle forever.
7. What Are Console Logs and Error Checking?
Console logs help you identify mistakes in your script. You learn that if your game crashes, freezes, or behaves incorrectly, the console will show the errors. Understanding how to read these messages helps you debug your code and fix problems more quickly.
Activity 1
Title: Blocker game part 2
Short description: In this activity, students will learn concepts of basic coding. They will be introduced to Lua i.e. the language of Roblox. They will also learn about variables, functions and loops.
Solution: Step-by-Step Activity Explanation
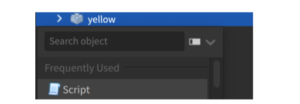
Let’s choose which part you want to appear and disappear first. Click on the part in the explorer and then click the + option in front of it. Choose Script.
Step 1: Adding a Variable
In programming languages, we have two types of values:
- Constant – a known value that does not change. For example, the number of fingers on your hand is constant (always 5).
- Variable – an unknown value that can change. For example, your height changes over time and is a variable.
Since the value of a variable is not defined, we usually represent it by naming it as a letter or a word like x, height, etc.
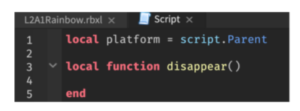
In our case, let’s call the variable platform.
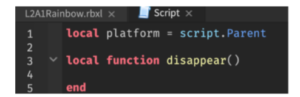
To define the variable, copy and paste the following code in the coding panel:
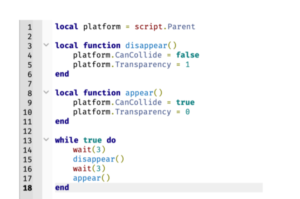
local platform = script.Parent

- The term
localsignifies that the variable will only be used locally, i.e., only in this script. - The term
scriptrefers to the script you’re working on. - The term
Parentrefers to the location where the script is located.
Step 2: Calling a Function
Now that you have defined the variable, it’s time to add a function to it. A function is an action being performed on a variable. In our case, disappearing.
Create a function by copy-pasting the following code in the coding panel:
local function disappear()
end
- The term
localsignifies that the function will only be used locally, i.e., only in this script. - The term
functionsignifies defining a function. - The text
disappear()signifies the name we’re giving to our function. - The term
endis used as the last line of code of the function.
STEP 3: Exploring Properties
Before we define functionality for our function disappear(), let’s explore some properties of the part we’re working on.
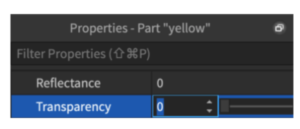
Transparency Property: As we will need the part to disappear completely, we will need to reduce the transparency of the part to 1, i.e., full.
We can do it by going to the property window, but how will we time the transparency then? Through coding!
Colliding Property: Another property we will explore is the colliding property. Ticking the colliding box ensures that the player doesn’t just pass through the obstacle and is actually able to stand on it.
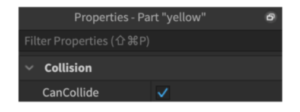
But when the obstacle disappears, the player should be able to pass through the block and hence we will need to untick the box. But how will we time the colliding property being on and off? Through coding!
STEP 4: Adding Properties through Coding
Now that we are aware of the pre-existing properties, let’s apply them to our game.
- When the block disappears, what should be the transparency of the block?
1i.e., full transparency. - When the block disappears, should ‘Can Collide’ be on or off? Off since we do not want the player to collide with the obstacle once it disappears. The player should fall off and lose.
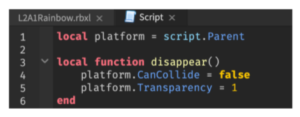
Let’s add this logic to our coding now. We have already defined the function disappear().
Now, to decide how the function behaves, type the following text before the end:
platform.CanCollide = false
platform.Transparency = 1
You can playtest to see if the obstacle has disappeared.
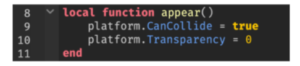
Similarly, when we want the obstacle to appear, we define a function called appear():
local function appear()
    platform.CanCollide = true
    platform.Transparency = 0
end
STEP 5: Timing Properties through Coding
Now that we have defined how our functions appear() and disappear() work, the next step will be to define for how long the obstacle appears and for how long it disappears.
To keep it simple, let’s aim for the platform appearing for 3 seconds and then disappearing for 3 seconds. To implement that, we will take the help of loop coding.
What is loop coding? When we want the function to repeat a certain number of times, instead of writing the code multiple times, we use loops. We only write the code once and define how many times we need the code to run.
Lua offers various types of loops, but for our game, we will be using the while loop.
What is a while loop? A while loop runs the code while the defined statement is true. Once the defined statement becomes false, the code stops running.
The syntax for while loop is:
while(condition)
do
   statement(s)
end
For example:
while(Sam’s age < 10)
do
   Check homework()
end
Here, instead of writing the checking homework function 10 times, we used the while loop. Now until Sam is 10, the code will keep running. Once Sam is 10, the code will automatically stop running.
In our case, we need the code to run infinitely. So we provide no condition. We simply write:
while true do
end
Note: DO NOT test your code yet since the code is not running infinite times and might crash the game. Add a WAIT function first.
Adding a Wait Function: Since currently, we haven’t defined any wait time, the obstacle will keep appearing and disappearing every microsecond. But as discussed, we will need the wait time of 3 seconds for the obstacle to appear and then 3 seconds for the obstacle to disappear.
To do that, we will use the wait() function:
while true do
    wait(3)
    disappear()
    wait(3)
    appear()
end
Here, we have added 3 in parenthesis to define the wait time of 3 seconds.
You can playtest your game now to see if your code works!
You can also duplicate the code to alternate obstacles to make them appear and disappear.
Outcome
Learning Outcomes of Basic Coding in Roblox
- Understood the basics of Lua as the scripting language of Roblox.
- Learned to use variables, functions, and properties to control object behavior.
- Applied transparency and collision logic to create disappearing and reappearing platforms.
- Used loops and wait functions to time actions and create continuous effects.
- Practiced debugging by checking console logs for errors during playtesting.
Assignment: HOPPING MAGIC STONES
Today, we’ll use the game made in ACP 1 – ‘HOPPING STONES’ and make it more difficult by making some of the obstacles appear and disappear.
Goal
To get started with basic coding in Roblox.
Getting started
- STEP 1: Open the ‘Hopping Stones’ project we made in ACP 1.
- STEP 2: Go to the explorer and select the part you want to disappear at regular intervals.
- STEP 3: Add a script to it. Delete the default code.
- STEP 4: Add a variable called
platformby copy-pasting the code below:local platform = script.Parent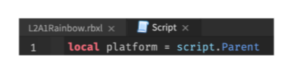
- STEP 5: Defining and calling the function called
disappearby copy-pasting the code below:local function disappear() end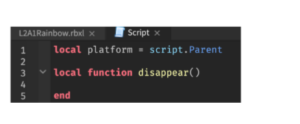
- STEP 6: Adding transparency and collide property through coding by copy-pasting the code below:
platform.CanCollide = false
platform.Transparency = 1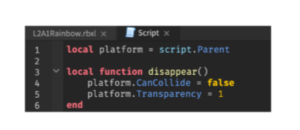
You can playtest to see if the obstacle has disappeared.
Similarly, when we want the obstacle to appear, we define a function called
appear():local function appear() platform.CanCollide = true platform.Transparency = 0 end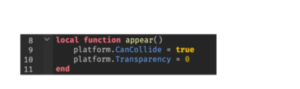
- STEP 7: Timing the properties to occur every 3 seconds for 3 seconds by copy-pasting the following code:
while true do
    wait(3)
    disappear()
    wait(3)
    appear()
end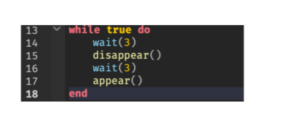
You can playtest your game now to see if your code works!
FINAL CODE:
- STEP 8: Copy paste the code to the parts you want to disappear and appear on regular intervals.
- STEP 9: Save the project.